I have a habit of diving into things.
Sometimes it’s from impatience or excitement, but usually it’s something I can laugh at later – like the time I just couldn’t wait for help and lugged a bookshelf up two flights of stairs by myself. (Hey, my books needed more room!) But while working on a novel during my MA, just diving into a bigger writing project wasn’t going to cut it.
Whether you’re writing fiction or nonfiction, there tends to be two stereotypes of longform writers:
- The Planners chart everything out ahead and know exactly what is going to happen and when in their manuscript.
- The Pantsers probably have a general idea of what will be in the manuscript and where it should go, but they try to let it unfold naturally as they write. They “fly by the seat of their pants.”
Obviously, most writers fall somewhere in between the two – which is probably for the best. As someone who leans more toward the Pantsers end of the spectrum, I worry that if I plan out too much, I could overlook an opportunity or stifle some creative aspect. But when I got halfway through my novel and realized I wasn’t 100% sure how I was going to get from there to the ending, I knew I needed a better way to plan ahead.
Many fiction writers use some variation of the popular index card technique, where you write down all the important scenes that need to happen in a novel on separate cards. (There’s plenty of versions and guidance online, but here’s one from Writer’s Digest.) But until I joined How2Conquer, I hadn’t heard of a similar technique for nonfiction writers.
Why Not Just Use an Outline?
If you’re a fan of outlines, I mean no disrespect here. Outlines are… okay.
But I have a few issues with them:
- They’re stagnant and linear.
- They can feel overwhelming once you add a lot of detail.
- They can’t hold all the info you could really use.

Outlines can feel like a wall of text. Yes, you can cut and paste, or drag and drop in Word, but it doesn’t change the fact that an outline locks you into a linear progression. This can make it harder to imagine tackling different pieces of the manuscript out of order, and it may even discourage restructuring, especially if the outline was difficult to nail down in the first place. If you prefer using mind maps or another more visual means of brainstorming, you might have experienced how overwhelming it can be to work through a huge outline.
Most importantly, the format of an outline severely limits the information you can include. Even with a clear taxonomy or system of organizing elements, you’re still just working with ordered lines of text. And as you continue adding more detail, the outline gets longer, making it harder to process the information from a higher level and more likely content might get out of order.
Use a Content Organizer!
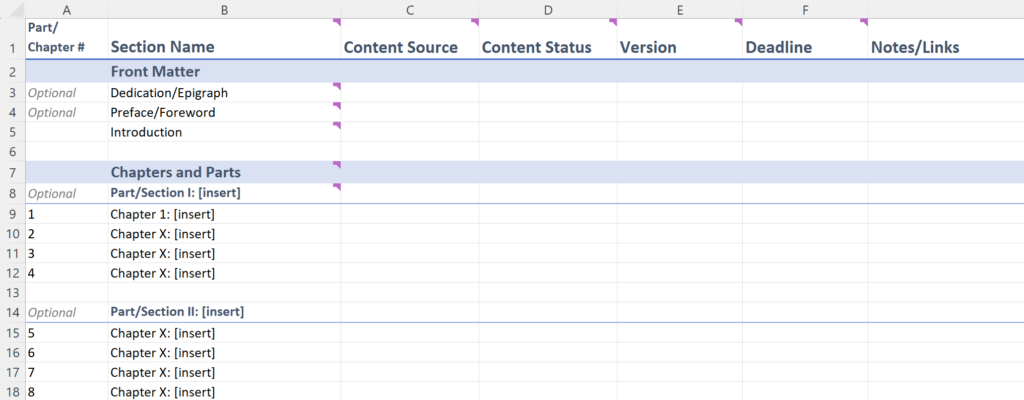
At first glance, you might think the content organizer above just looks like an outline added to a table. But there’s more to it than that.
All the Details You Need
One of the big benefits of the index card technique for fiction is that it allows you to document some of the finer details that will impact the story, like the characters in a scene, any important objects that should be mentioned, and the status of different subplots at that point.
A content organizer can do the same for nonfiction, just with different details. For example, in the image above, you can see we’ve included a “Content Source” column, which could be useful for someone who is compiling and updating existing content they’ve written. The notes/links column could include key items to address in the chapter and resources to reference or recommend.
Depending on the topic, specific nonfiction genre, and style, you can add other columns to catch all the important information you’ll need. If the amount of detail ever feels overwhelming, you can hide columns or set row filters according to focus.
What columns would you add to your content organizer? Let us know in the comments below!
Manuscript Structure
Having the important details for each section organized and easy to review can also help you work on the structure of your manuscript.
First, you can see how topics are distributed through the book. Do a few chapters seem like they could use more content? Do any need to be broken down more so you can explore the topics in more detail?
Do you see anything potentially coming up a few times – like a piece of guidance, question for consideration, or another common thread? Would it be beneficial to the reader for you to highlight these – for example, in a recurring tip box – or to even incorporate them into the structure of the book itself?
Since each part of your developing manuscript is available at a glance, you can also use this as an opportunity to work on different parts in separate documents. This helps break your project up into smaller pieces for both drafting and review. If you’re working closely with an editor or beta/peer reviewers, this means you can work in tandem – they can review completed sections as you draft or update others.
Breaking a Big Project into Manageable Pieces
One of the hardest parts of a big writing project can be setting goals and holding yourself accountable to them. But tracking what chapters are “done” and which ones need another pass can also be difficult, especially if they’re all in one document a little too early.
Our template includes columns to help manage the “admin” pieces of writing a book, so writers can work through different sections as they’d like, rather than moving linearly from introduction to conclusion.
- Content Status can let you know where a section is in your writing process, whether it needs content, needs edits, or if you’ve passed it on to someone else for review.
- Version allows you to track different iterations of a document. If you keep finding yourself saving documents as “document-final-FINAL-FINAL-done,” take a look at versioning – it’ll change your life, I promise.
- Deadline is a deadline you set for yourself to finish a chapter draft, section edit, etc. Use it to set achievable goals that will help push you while remaining accountable to yourself (or a chosen writing/editing buddy).

Platform Considerations
We created our template in Excel for ease and compatibility, but you can supercharge a content organizer with the right platform.
There’s a plethora of project management tools out there, and many of them allow you to toggle between list/table, Kanban, calendar, and other types of views. Even with a free account, you can use this to better visualize where different chapters are in your process and what deadlines you have coming up. With a Kanban view, you can even think of it like digital index cards. Other project management app capabilities – like filtering, tags, and attachments – could also come in handy.
Check Out:
Plotters and Pantsers, Let’s Get Writing!
Whether you fill in your entire content organizer or only get the first three sections down before diving into writing, we hope our template will help you tackle the blank page! Be sure to let us know how it’s going and if you have any recommendations to share.

Emily Owens
Emily joined How2Conquer soon after moving back from Newcastle, England, where she lived for nearly seven years. Previously part of Mslexia, a UK-based women’s writing magazine, Emily is always a little bit homesick for the Toon, but she’s excited to be guiding H2C as it grows. In her spare time, she is the editor and founder of Palm-Sized Press, writes creatively as E.M. Killaley, and enjoys a number of nerdy TV shows. When she’s not geeking out over a good font or InDesign file, she argues with MadCap Flare.