Some publishers specify guidelines. There’s plenty of general advice out there about margins, font, etc. But have you tried using styles?
When I started writing my first (and still back-burner WIP) novel, I followed the formatting guidelines I’d been taught: 1” margins, size 12 Times New Roman, a cover page, etc. I’d had creative writing professors in both my undergrad and graduate programs advising how a “professional” manuscript should look – or how most publishers preferred them to look. Formatting our manuscripts this way was supposed to show publishers we knew what we were doing and, when a submission opportunity specified formatting guidelines, that we could follow directions.
But to get the right look, I was using the enter key way too much. I filled the cover page with empty lines to place my contact details at the top and the title toward the middle; to add a little more definition, I started every chapter with a manual page break and two empty paragraphs before the chapter number, hammering away at the return key each time. I should mention that this is what we were supposed to do, and there’s plenty of formatting guidance out there still that recommends this. But what if I’d changed my mind about how many lines I wanted before a chapter number, or what if I’d encountered guidelines that differed? I cringe to imagine.
There are much easier and more beneficial ways to style your manuscript beyond font and margins. As an editor, I know formatting guidelines are often somewhat vague to allow some variance, but most also seem a little antiquated – stuck in a past when we were leafing through physical pages rather than just scrolling on a laptop.
Don’t miss the downloadable Word template below!
Use styles!
One of my most backwards learning experiences was figuring out styles in Microsoft Word, when I was already very familiar with using them in Adobe InDesign.
Sometimes I think about all those extra, empty paragraphs, and the time I spent fixing things when something occasionally went wonky. You probably know what I mean – I didn’t use any exciting fonts or anything, but we’ve all fought with Word at least a few times. And navigating that giant document always meant a lot of scrolling.
What I don’t understand is how I never came across anyone who suggested, “Hey, have you tried using styles?”
What are styles?
Styles essentially tell a program or software: “I’m going to use this font/size/color and paragraph spacing again. I’ll call it ‘X’ so you know when to use it.”
Word already has pre-built styles you can use. Just look at the Home tab – when you first start typing, it’s probably using the “Normal” style. And when you click over to the Design tab, you’ll see other options for style sets and colors.
Any program that uses styles utilizes some kind of stylesheet to support this, but you don’t have to know anything about CSS to modify Word styles.
Styles can help you and anyone else who reads your manuscript
Using styles will make some things a lot easier for you, the writer. You can apply formatting with one click. If you need to change a style, you only have to update it in one place to see the change applied throughout the document.
But styles will also be appreciated by others who may read your manuscript, from friends who volunteer as beta readers to professional editors and publishers.
Styles help navigation
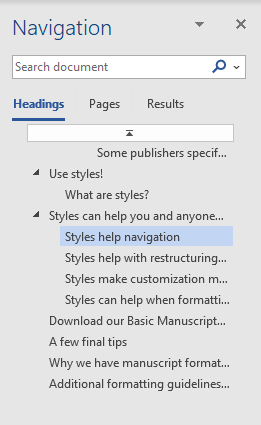
One of the first things I notice when I open a manuscript is how easy it is going to be to navigate the document. Particularly with longer pieces – for example, a full manuscript versus a sample – I need to know how easy it will be to jump back to the introduction when I’m on page 103.
How do I determine this? I open the Navigation Pane. You can have a full table of contents with correct page numbering, but if there’s nothing in the Navigation Pane, the TOC isn’t going to help all that much with reading on a computer.
Heading styles – for example, Heading 1, Heading 2 – specify outline level. The Navigation Pane simply shows these headings, indented and organized into an outline you can use to click between different sections. This outline can also be used to generate a table of contents, in case someone does need to print the document.
Here again I’m mourning how I didn’t know about Word styles when I was first writing my WIP. Do you know how long I probably spent scrolling between chapters while editing?
Styles help with restructuring content
So you have this handy little menu to the left of your document that you can use to navigate between the different sections or chapters of your manuscript. But what if you decide you want to move chapter 1 down to 4, or move a heading from chapter 6 into the introduction?
This may be more useful for the nonfiction writers out there, but headings and your Navigation Pane can help here too. All you have to do is select the heading and drag it where you want to, and all the content – all the normal text under that heading – will move with it.

If you’re using numerical headings – e.g., “Chapter 1” – you will have to manually update the number in the heading text itself. But once you’ve done that, if you’ve included a table of contents, all you have to do is right click and select “Update” to see the updated outline.
Whether you’re editing your manuscript yourself or working with an editor, this ability to easily move content around is incredibly useful.
Styles make customization much easier
Do you want every chapter to start on a new page? Do you want there to be a specific amount of space after the title of each chapter? (Sorry, past me.)
Once you’re comfortable with using pre-defined styles, you can modify and play with them to create a format that works for you. And if you decide to change something – like font size or paragraph spacing – all you have to do is modify the style, and every paragraph using it will automatically update to match the change.
Styles can help when formatting guidelines differ
So you’ve formatted your manuscript to fit the general guidelines available out there. Most publishers would be happy with how it looks, but what if you’re submitting somewhere that has very specific instructions?
Maybe you’ve indented every paragraph, but they want no indents and extra space after every paragraph. Or maybe you’ve used Arial for your headings, but for some reason they’re demanding Times throughout the document.
Again, all you have to do is update the styles! (No more scrolling through and changing every heading individually…)
As a bonus, if you save a template, you can apply it to any document. That style you so carefully created to help you work – perhaps with your preferred spacing, or the Dyslexie font to make reading and writing easier – can be ready anytime you start a new document. And when you’re ready to submit your manuscript, all you have to do is change the template to one that uses those standard formatting guidelines.
Try our Basic Manuscript Template!
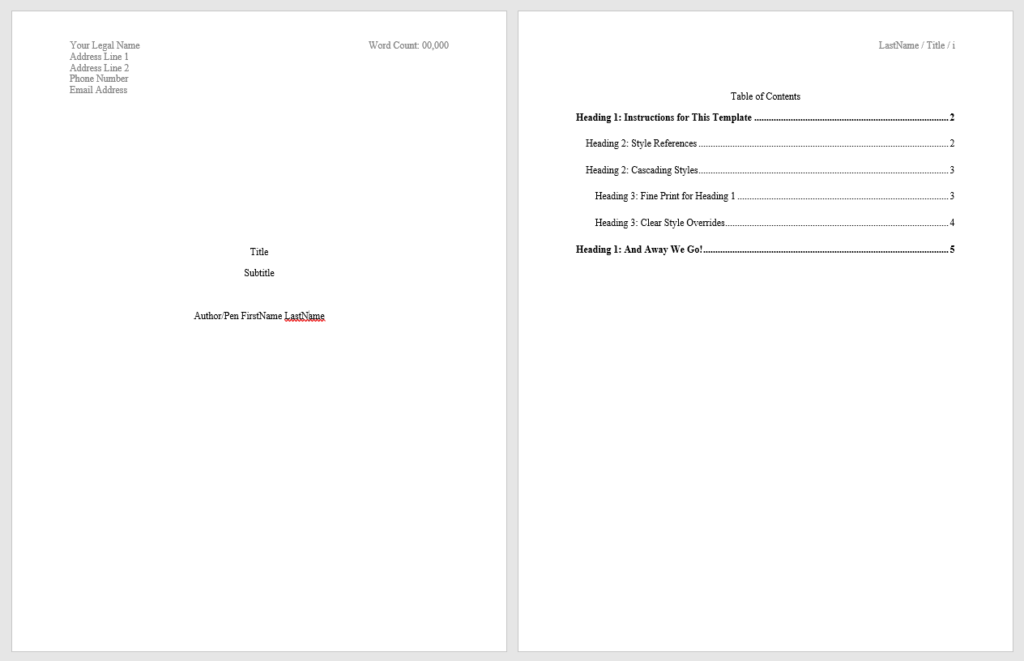
Click here to download!
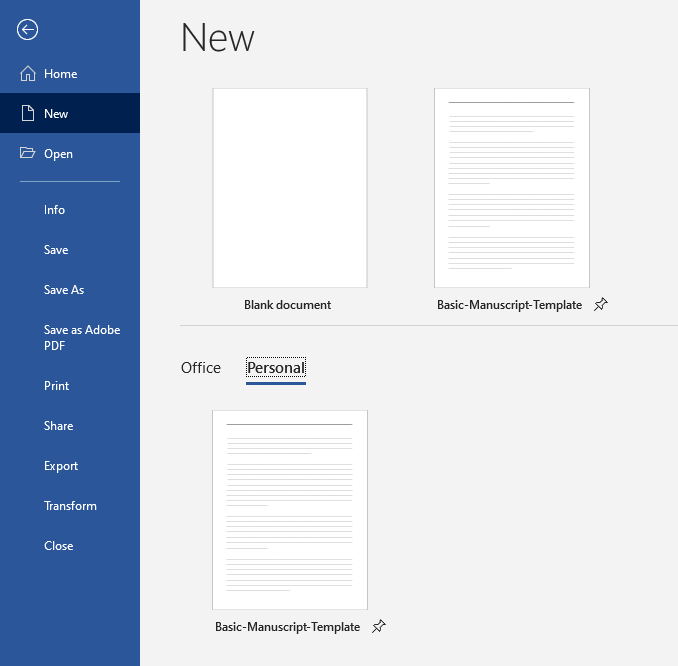
Save the template in your Custom Office Templates folder. You’ll probably fit it in:
- C:UsersUsernameDocumentsCustom Office Templates
If you’re using an older version of Word, your templates may be saved in one of these folders:
- C:UsersOwnerDocumentsCustom Office Templates
- C:UsersUsernameAppDataRoamingMicrosoftTemplates
Once you’ve saved the template, you should be able to see it on the New Document screen under the “Personal” templates. You can also pin it to the top menu, as shown below.
A few final tips
- Use a single space after periods. If you’ve used two, you can always do a search and replace.
- Don’t use the tab key to indent paragraphs. Use the first line indent option for your “Normal” style. (You can also do a search and replace for these, using ^t to search.)
- Use styles to define page breaks. For example, if you’re using Heading 1 for chapter titles, set Heading 1 to have a page break before.
- Follow genre standards. (For example, fiction usually uses indented paragraphs without full paragraph breaks, while nonfiction usually has no indentation with paragraphs separated by a full paragraph break.)
- Send your manuscript as a Word document. (In other words, please don’t send PDFs.)
- Save your manuscript with a descriptive file name, including your last name and title. Use underscores (_) and dashes (-) instead of spaces. For example: Lastname_Your-Title_year.doc
Why we have manuscript formatting guidelines
Manuscript formatting can feel like a pain – why is it so important if I can use Calibri in some cases, but only Times in another? For me, I think this annoyance was really about anxiety – a persistent fear that I was doing something wrong.
But these guidelines are meant to help everyone. For writers, formatting a manuscript well shows an awareness of industry standards, as well as respect for the craft of writing and editing. For editors and publishers, formatting guidelines ensure the manuscripts they receive are easier to read and navigate.
When guidelines are vague, it’s often just to make it easier for writers to follow them. When they’re more strict, it may have something to do with the workflow the editor/publisher has set up – for example, when processing submissions for a competition, they may ask that you don’t include your name in the header of each page, to allow for anonymity in the judging process.
The truth is that most editors and publishers won’t mind if you get a few things wrong, as long as it’s clear you made the effort. Just be sure to check for any specific formatting guidelines before you submit, and if in doubt – just ask.
Additional formatting guidelines resources
- How to Format a Book: 10 Tips Your Editor Wants You To Know (The Write Life)
- Manuscript Format: Create a Professional Manuscript (Reedsy Blog)
- What Are the Guidelines for Formatting a Manuscript? (Writer’s Digest)

Emily Owens
Emily joined How2Conquer soon after moving back from Newcastle, England, where she lived for nearly seven years. Previously part of Mslexia, a UK-based women’s writing magazine, Emily is always a little bit homesick for the Toon, but she’s excited to be guiding H2C as it grows. In her spare time, she is the editor and founder of Palm-Sized Press, writes creatively as E.M. Killaley, and enjoys a number of nerdy TV shows. When she’s not geeking out over a good font or InDesign file, she argues with MadCap Flare.